What is the Creative Commons?

I wasn’t sure if I should have called them a “who” or a “what”, but one thing’s for sure…if you’re putting content online, you should be aware of what CC is. First and foremost, copyright laws and regulations were designed years and years ago in a time where there was less to worry about in the way of content theft. We’re talking about the days before the Internet, computers and even copy machines. If someone wanted to steal your manuscript for example, they would physically need to possess it and then make a hand copy. While it was harder to steal content, it was also much easier to find out when someone did. Now, it’s easier to steal content, and much harder to found out when someone does it.

Today, we have computers, the Internet and copy machines plus a whole slew of computer programs that make digital copying and manipulation possible and surprisingly easy. The problem is that general copyright enforcement has not been able to cross over to the new age—that is until now.

Creative Commons

According to their own mission statement,

Creative Commons develops, supports, and stewards legal and technical infrastructure that maximizes digital creativity, sharing, and innovation.

Anyone who uses Wikipedia on a regular basis has seen the full power of Creative Commons at work. In fact, every single picture you click on will have a variation of a CC license attached to it. Copyright owners can mark their work with a customized copyright license that may or may not extend any rights to 3rd party users. Just the same, Flickr users have access to select various licenses for their work as well.

So to put it into simple terms, if you create a digital work (photograph, video, etc) and you wish to display it online, you can use Creative Commons to attribute a specific license to the work that allows you to decide how that work can be shared, copied, used, manipulated or displayed should someone come along and wish to do one or all of those things.

How licenses work

CC uses a 3-layer license format. The first layer represents the Legal Code which is all the legal mumbo jumbo that most of us non-lawyers don’tCreative Commons License Layers really understand. These are the words that basically dictate what is protected and what is not on a copyrighted work. On top of this comes the Human Readable layer that incorporates something that CC calls the Commons Deed. It is essentially a watered down version of the legal code beneath it. In other words, rather than sort through long paragraphs of rules and restrictions, the Commons Deed simply points out the most important facets of the copyright status.

Finally, the top layer is a machine readable layer that contains all the same legal information as the previous two, but can now be accessed by software used on computers, in search engines and on hardware that makes copying possible. This allows manufacturers and software vendors to create new ways of stopping the illegal copying of copyrighted materials. For example, on Flickr, if you don’t want to allow people to download your images, you can set the license to do that and Flickr can read this license and block people from downloading the image. It’s a great piece of technology. Now if only we could stop screen capture programs!

There are 6 types of Creative Commons licenses. I won’t go into all the details here, but this is a basic rundown of what the differences are:

  • Attribution – This license lets others distribute, remix, tweak, and build upon your work, even commercially, as long as they credit you for the original creation. This is the most accommodating of licenses offered. Recommended for maximum dissemination and use of licensed materials.
  • Attribution-ShareAlike – This license lets others remix, tweak, and build upon your work even for commercial purposes, as long as they credit you and license their new creations under the identical terms. This license is often compared to “copyleft” free and open source software licenses. All new works based on yours will carry the same license, so any derivatives will also allow commercial use. This is the license used by Wikipedia, and is recommended for materials that would benefit from incorporating content from Wikipedia and similarly licensed projects.
  • Attribution-NoDerivs – This license allows for redistribution, commercial and non-commercial, as long as it is passed along unchanged and in whole, with credit to you.
  • Attribution-NonCommercial – This license lets others remix, tweak, and build upon your work non-commercially, and although their new works must also acknowledge you and be non-commercial, they don’t have to license their derivative works on the same terms.
  • Attribution-NonCommercial-ShareAlike – This license lets others remix, tweak, and build upon your work non-commercially, as long as they credit you and license their new creations under the identical terms.
  • Attribution-NonCommercial-NoDerivs – This license is the most restrictive of our six main licenses, only allowing others to download your works and share them with others as long as they credit you, but they can’t change them in any way or use them commercially.

For more information on the licenses, the logos that you can use to place on or near your work and a form to create your own licenses today, please check out the Creative Commons website.

My two cents

I fully support the Creative Commons movement and now that I’m beginning to post my digital photography online, I can clearly see the value in such a system. However, I’m also a realist so I understand that nothing is full-proof and even though systems like these are in place, there will still be ways to get around them and there will always be people willing to steal and copy materials from the Internet. It’s simply the way of life. But because I know this, I’m willing to assume that anything I post online will be accessible to the world and at any given time, can be copied and manipulated in any form.

That’s good advice for anyone wishing to post photos and videos online whether it’s on your own site or places like Facebook and YouTube. Think before you post.
Dashes, En Dashes, Em Dashes and more Dashes

Commanding your chosen language is essential to everything your blog is and will be. Poor grammar, mis-spelled words and inappropriate use of words will not only make your readers confused, but it can also damage your reputation. Throughout history, these bad traits have made writers seem uneducated or just plain dumb.

Today, I was dealing with an issue that I’ve often wondered about, but never really took the time to figure out. I was writing in Microsoft® Word and I wanted to use a “double-dash” which I knew to be an element that allows you to separate two very distinct phrases, but not distinct enough on their own to create two different sentences. Naturally, Word will do this for you if you type in the two dashes and continue to your next word. My question was simply, when do you use this dash and are there any other variations. I was surprised to learn that there was.

Hyphen ( – )

The hyphen is your standard dash line that you can use to separate compound adjectives, verbs or adverbs. Some examples of proper usage are:

This site runs on an Linux-based server.
Creating a WordPress-powered website is easy.
The German-designed car was much faster.

Hyphens can also be used to separate proper names as well as any other wordbreaks that may be required.

En Dash ( – )

For some reason, you can’t see the length in the title, but the En Dash is slightly longer than a hyphen and is used to show range between something. For example:

The Lakers beat the Heat 91–87.
The Los Angeles–New York flight was about 6 hours.

The reason it’s called an En Dash is because it’s approximately one ‘N’ long. To get the En Dash to show up in HTML, the code is – or –. In Word, you have to click on Insert → Symbol. The En Dash can also be used in conjunction with hyphens too, such as in:

Dual-core–64-bit processors are much faster than 32-bit–single-core processors.

Em Dash ( — )

The longest of the dash family is named accordingly due to its size being that of about one ‘M’ long. As previously mentioned, in Microsoft® Word, this symbol is created when typing in two hyphens together. In HTML, you can get this by using — or —. It’s used to separate parenthetical elements that tend to be abrupt.

This is contrary to commas, which separate parenthetical elements that are not abrupt. Some examples of proper Em Dash usage:

The cake—with chocolate sprinkles and all—was amazing!
There were many people at the reunion—most of which were old classmates of mine.

My two cents

Great writers aren’t made overnight and even though some people have a knack for their native language, anyone can become great at writing. The first step is to be aware of how the language works. Avoid slang and other non-conventional ways of writing. Learn how to spot errors and always, always proof-read your work before posting! I think one of the biggest mistakes bloggers often make is that they write with their audience in mind. While that is great strategy for topical content, it’s not a good move for grammar. In other words, just because your Internet audience often types like this: “hey u, wats up? hows ur day been goin so far!?” doesn’t mean your blog should reflect that same style.

Multiple WordPress Multi-User Installations

I’ve scoured the Internet looking for the answer to this question and I have found it. The question was, can you you install multiple WordPressMU blogs and have them run under one webhost. The short answer is no. However, as with most things in the online world, it is possible with the right “tool”.

If you’re wondering why I would want to have two separate installs of this, it’s because I have more than one client on my web server, each of which are running their own sites. This is fine for most applications, but when you start dabbling in things like SSL certificates and wildcard sub-domains, that’s when the trouble starts. These are just two items that require their own IP address.

One of my clients would like to run multiple blogs on his WordPress Network, but because I’m already doing that for Ledfrog.com, I’m essentially blocking him from doing so. This is because Ledfrog.com is the main domain on my server and any changes utilizing different ports such as 443 for SSL certificates or services like WordPressMU that use wildcard sub-domains have to go through the server’s IP address and since this IP is assigned to my domain, his will not work.

The way WordPressMU works is once you convert your WordPress install into a network, you have the ability to add new sites to it. These sites utilize all of the main structure of the original WordPress installation while creating a separate blog directory inside the wp-content folder to store all of that blog’s specific files such as media uploads and so forth. Plugins and theme are then made available to all sites provided that you (the network admin) have made them available. The advantages here are that you no longer have to install a whole new copy of WordPress, create a new database, download all the same themes and plugins or manage different webhost accounts every time you want to start a new blog. Everything except the media files are shared. You can imagine how much faster updates are too!

Anyway, to make this happen, you need to create a wildcard sub-domain ‘A’ record in your DNS server that points *.yourdomain.com to your server’s IP address. This is needed because when you create a new site on your network, a virtual subdomain is created. An example of this is my personal blog site, Ledfrog.me. When I created it in my network, I was actually creating me.ledfrog.com.

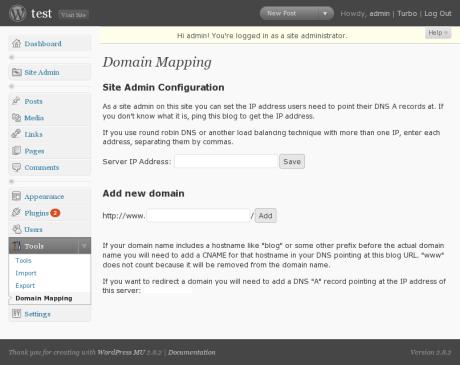
The real magic happens with a feature called Domain Mapping. This is where you can map a real domain (provided it’s been added to your DNS server) to any virtual WordPress site you have created. Using the same example, I was able to map the domain Ledfrog.me to my virtual blog, me.ledfrog.com, so when you access either of those URLs, you’ll wind up at Ledfrog.me. Make sense?!

WordPressMU Domain Mapping

So all this is fine and dandy when you’re working with one server, one IP address and one main domain, but in my case, another client of mine would like to create his own network. The problems begin when you try to create the wildcard sub-domain. While doing this is possible and serves a valuable function—allowing him to create his own real sub-domains—it does nothing for WordPressMU!

I’ve contacted my webhost, I’ve ran all over Google and even tried Bing out for the first time looking for some help with this and eo far I’ve found two answers. First, I keep getting sent to sets of instructions that allow you use vhost.conf files in your client’s vhost container to allow the use of a wildcard sub-domain. This process basically has you creating a conf file that you then configure into Apache to tell the server that you want it to be included into the configuration for that site. It’s great for adding site-specific features to httpd.conf without affecting your whole server.

The second answer I get is the correct one. You can’t use WordPressMU on two separate installations without an additional static IP address! To verify this, all you have to do is install it on another client on your same server and watch what happens when you try to access one of the the virtual blog sites. Here’s what it does:

Domain1.com is the main domain attached to the server’s ONLY IP address.
site2.domain1.com is a virtual blog site created inside the WordPressMU installation.
site2.com is the domain that is mapped to the sub-domain above.
If you access site2.com, you are really only looking at site2.domain1.com.

Domain2.com is in another client’s hosting account on the same server and same IP address.
site2.domain2.com is a virtual blog that’s created inside the WordPressMU installation.
If you access site2.domain2.com, you are redirected to Domain1.com with an error about registrations being closed.

The reason for that is because site2.domain2.com is being read as a sub-domain of Domain1.com!!

I hope you’re not confused. More so, I hope someone who reads this is laughing their head off because they know the way around all this. Oh and by the way, I’m not try to escape having to purchase a separate IP address. It’s just that my host won’t sell me one without a valid reason and apparently this doesn’t count because they said it’s possible to use one address!

What can BlogGlue do for you?

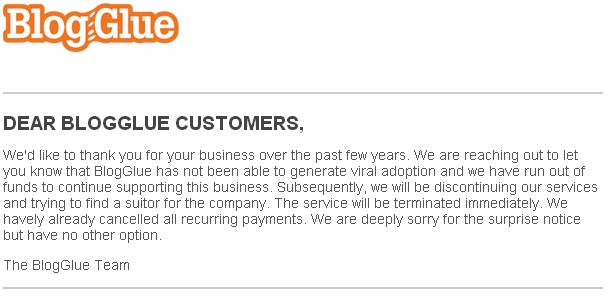
UPDATE: BlueGlue is no longer in service. Per an email I received yesterday, the company running BlogGlue has decided to shut down the service and seek some sort of buyout. It’s possible that this service could be resurrected under a new owner, but I wouldn’t hold my breath. It was fun while it lasted! I’m leaving this article up for historical purposes, but will be removing all outgoing links. This was the email sent out to all users:

BlogGlue Closed

Original article:

Just over 1 year ago, I joined a little known website called Arkayne. I even wrote about how to drive focused traffic to your site with Arkayne being the central topic. The purpose of Arkayne was to enhance your blog’s presence by connecting the posts you create with other blog owners who write about similar topics. It was such a simple concept; one that has helped my site grow in ways I didn’t think were possible. Today, Arkayne is now BlogGlue and their concept has remained simple, but has become much more powerful.

For me, blogging isn’t about ranking high in search engines or making thousands of dollars a day selling useless information or products—it’s about sharing ideas and providing valuable information about the things I know with people who want to learn. Of course, if I made thousands of dollars doing this, that would be great, but I don’t intend to sacrifice quality for quantity. This is where BlogGlue really helps out.

BlogGlue Partnerships

The give and take process of BlogGlue starts with a recommendation. As you browse the ever-growing community of blogs, you’ll start noticing many websites that share some common interests with your site. As you click through each one, you can choose the ones you like based on how well they complement your site and submit a recommendation.

The site owners you recommended are then notified of your recommendation and have the option to review your site. If they like what they see and recommend you back, you both become partners. At that point, your blogs are linked.

The plugin

The BlogGlue plugin on your site will add Related Links at the bottom of each post. It gets these links from your partners, so it’s important not to just add every partner under the sun to increase your count. Your site, your partners’ sites and your visitors will all benefit from these partnerships.

The process works both ways as well. Your links will start appearing on partner’s sites in the same location. This is the main function of BlogGlue and it works really well! The more partners you have, the most choices the plugin will have in pulling quality content. And as you would imagine, if you don’t like a particular site’s content, simply delete them as a partner and their links will never show up again!

When writing a post, the plugin also offers some instant help with basic SEO tips. After you saved your first draft, you can click the Test Now button and see exactly what you might be missing and how you can improve the page’s optimization.

The costs

There are three service plans available.

  • Free – $0.00/month – You accept up to 5 partners, but you can have unlimited recommendations. Your site content is limited to 200 pages/posts.
  • Basic – $9.97/month – You can have up 15 partners and still have unlimited recommendations. Your site content is limited to 1000 pages/posts.
  • Unlimited – $19.97/month – You can have unlimited partners and unlimited recommendations. Your site content is limited to 5000 pages/posts.

The best part about these plans is that you can grow into them. Start out free and as you start to notice your traffic increasing, just upgrade instantly to the next plan. At some point, your site will be getting hundreds or thousands of hits a day and the unlimited plan will be needed, but you’ll likely be making money at that point!

There are no contracts, hidden fees, cancellation charges, upgrade charges, taxes, etc, etc.! What you see is what you get.

My two cents

I’ve been using BlogGlue for over a year now and I can tell you just by looking at my stats, they have helped my site grow almost 300% and the numbers continue to rise as I become partners with more and more quality blogs. Their customer support has been super gracious and exceptionally fast with any issues I’ve had and I haven’t had many…that’s for sure.

I can’t say enough great things about the operation they’re running over there. Check them out over at www.blogglue.com.

Websites are stealing my content! What should I do?!

Often, bloggers are faced with the harsh reality that at some point, their website’s content is going to be copied (or stolen) by one or more websites. Not only can this hurt you emotionally, given the amount of time you probably spent writing a quality piece, but it can severely hurt your website as a whole. As anyone with basic web knowledge knows, search engine ranking is the game of the day. Without a good rank, your site is considered dead.

Why?

The reasons behind why other webmasters steal content can vary from person to person, but generally, these are the top three:

  • Domain rank – Whether you knew it or not, the words used to make up your domain name are considered in your search ranking. An example of this is if you write a blog all about your favorite comic books, but your domain doesn’t mention anything about comics at all. This can cause another site, like myfavoritecomics.com to be ranked higher even if they’re content isn’t that great. How this translates into stealing content is simple: a webmaster goes and finds a domain name that better describes your content and then copies everything you have onto their new site. If they get their way, they will soon outrank you.
  • Autoblogging – This practice is more common than not. If a webmaster wanted to create a new site relatively fast and begin competing for search rank, all they would need to do is start an autoblogging service that scours the web looking for content based on keywords they input and off they go. Your content is copied and placed on their new site. I strongly discourage using these practices because they don’t enhance the web experience in any way, but if you’d like to read more about autoblogging, you should do so at your own risk!
  • Higher search rank – Naturally, the main reason for stealing content is to increase your web presence, however they’re doing so at your expense. If you operate a site that only gets crawled once a day and another site gets crawled every hour, then it becomes very possible for the other site to steal your content before Google even knows you had it. At this point, Google now ranks the other site higher and your site looks like the copycat!

So what can you do about this? The short answer is nothing much. The laws of the Internet (and computers in general) dictate that any content found online can be copied and everyone can access it. It’s the inherent downside to such a cool piece of technology. However, all is not lost! Your goal should be to protect your content as much as possible and one major way to do this is to update your site frequently. If you become one of those sites that gets crawled every hour, then you won’t have to worry about looking like a copycat.

Reporting illegal activities

In case you didn’t know, Google offers a way in which you can report content thieves and other spammers. Here are some tips on how to do that:

  • Remove content from Google – Use Google’s own form available at google.com/dmca.html to file a report against any content you find online that may be violating your copyright(s). With this tool, you can also report unlawful content and defamation/libel content.
  • Visit Dmca.comDmca.com provides services regarding all sorts of copyright infringements including watermarking photos and filing takedown requests for serious violators. These services aren’t free, but if you’re providing very valuable information, you should consider how valuable it is in regards to your Google standings.
  • Contact violators – The old fashioned way of confronting your attacker! I’ve had luck with contacting webmasters directly and asking them to take down copyright-infringed content and surprisingly had more luck with them actually removing content. This approach can help new webmasters understand the “laws of the land” as well as give them a sporting chance to better themselves.

Running a website can be hard and some of us put a lot of our free time into our publications. There’s nothing more dis-heartening than finding out that someone else may be reaping benefits from something you created. I now know how musicians feel as they watch all of their music being freely distributed throughout the world!

More information

Review the provisions outlined in the Digital Millennium Copyright Act to become more proficient in dealing with copyright claims. You should also out everyone who uses the Internet by filing reports against spam-filled websites. Google doesn’t want junk sites in their indexes, so let’s all help them out by getting them removed!

You can also view my copyright information regarding this site to help you with creating your own set of rules for visitors who use your site.

How To Hack The Facebook Image Bar

Ok so you’re not really hacking anything, but I figured using that word would grab more attention! With that said, this trick is nothing more than an easy manipulation of a new feature in Facebook. First of all, you’ll need to upgrade your account to the new profile layout if you haven’t already done so. You can do this by going to: facebook.com/about/profile/. Login and you’ll see the option to switch.

The New Layout

Also on that page will be a complete description of what visual changes will be made to your profile, but the only one we’re interested in is the new “snapshot” feature. This is the very top section of your profile that tells people some basic information about yourself:

My Facebook Snapshot

Above, you can see the highlighted area. You can see what I call the Facebook image bar. It’s a collection of the last 5 photos that someone tagged you in. It puts them in order from left to right, meaning that all newly tagged photos will show up on the left side and move their way down the line.

Hacking (Manipulating) The Image Bar

As you can also see by the screenshot, I have hacked my image bar to show ledfrog.com whenever anyone clicks on my profile. Naturally, I wanted to draw their attention to my site and I was not surprised to find out that people see those images before anything else on my profile! From a marketing standpoint, this is great news.

The process is generally easy, but if you’re using some intricate design work or you’d like to integrate your default profile pic into the mix as well, it can get a bit complicated. For basic instructions, follow these steps:

  1. Create an image that is 487 x 68px. (487px is counting the white spaces between each photo)
  2. Cut out the five images from your main image. Each of the five need to be 91 x 68px in size.
  3. Upload these five tiny images to your profile. It might be easier to create a separate photo album for them.
  4. Tag yourself in the photos one at a time. If your image needs to line up in a specific order, like mine, you’ll want to tag the last photo first and the first photo last. This way, they’ll show up in the correct order.

That’s it! When you’re done, go back to your main profile page and you’ll see your handy work.

Advanced Manipulation

Obviously there’s some small space between the tagged images, so your photos won’t line up perfectly (like mine), but if you’re dead set on getting the images cut with the spaces in the proper places, you’ll want to cut out the white space on your original image and then take what’s left and turn them into 5 separate images. Make note that the white space is exactly 8px wide.

I created a layered Adobe Photoshop® template that you can use to see where the cutouts will fall if you plan on using a full image to create all the tiny ones. Please note that this template was designed and sized from my own Facebook page. Yours may differ slightly in size and alignment. Use this template as a guide rather than a standard.

It’s super easy to use:

  1. Open the template in Adobe Photoshop®.
  2. Take the image you’d like to slice and dice and place it on a layer behind the cutout layer.
  3. Resize that image if necessary to fit into each of the 6 squares properly so it looks good.
  4. Cutout each image and save them separately.
  5. Upload all images to a new album (if preferred) on Facebook and make sure this album is visible to Everyone.
  6. Tag yourself in each of the smaller photos, but remember to tag the last photo in the lineup first!
  7. Take the 6th photo and make it your default picture and then you’re all set!

Here’s a sample of the template in use with a picture ready to be cutout:

Ledfrog.com Facebook Image Bar Template Sample

Issues

As you may have already guessed, the number one issue with doing this modification is that anyone who tags you in photos will be able to destroy your work of art! However, it’s not hard to fix. Just hover your mouse over the image(s) that you want to remove and a little ‘X’ will appear in the corner–click on that and the image will be removed from the top bar, but it will retain your tag.

You can also have a little fun with this too! You can tag your friends in your images and your hacked image will appear on their pages as well! Be careful though…if you start putting up derogatory things on your friend’s pages, you may not have any friends left. Worse case scenario, you could be hearing from the Facebook team if people start logging complaints about you.

I hope you enjoyed this tutorial. If you run a website, you are more than welcome to repost some of my steps above as well as the template download, however, I must ask that you retain credit to me by posting a link back to this article and leaving my website information inside the template. Also, please don’t hotlink the template file from my server! Upload it to your server instead.

The Problem With Twitter

I’m going to be starting a total cleanup of my site soon and part of this process included the re-evaluation of my social networking skills–or lack thereof. Generally, I use Facebook and Twitter to publish some of my blog posts from two different blog sites as well as links to other things on the Internet I like. So far, it’s worked pretty well. People are responding well to the Facebook links, but less from the Twitter links.

I think that’s simply because I don’t use Twitter all that much and it’s really more of an automated “side-feature” of my site–sort of like the overlooked black sheep in my collection of tools. The reason for this was because Twitter has become a polluted haven of spammers and junkie advertisers. It got to the point that my phone was going off every couple of minutes with push notifications about some random person I was following and how they just found the Holy Grail of ebooks to sell me.

Twitter as a promotional tool

Naturally when people are given a device that allows others to see what they do, they will take advantage and begin using it to plaster stupid information all over the place–many, many times per day! This is precisely what happened to me.

I’m all for using new and unique tools for self-promotion, but where do you draw the line? It’s almost like every spammer and blogger out there has a Twitter account and are using it to pollute the Internet with more useless information. I can always tell the spammers apart because they are always offering the same products for sale and they will post 100 messages a day to do it.

Twitter as a friend follower

What a novel idea! Use Twitter for what it was designed for!! The idea of having a tool that allows your close friends to send out an update about what they are currently doing or where they are was a unique concept only a year ago, but now even the social networks like MySpace and Facebook have adopted these features right into your profile page.

So where before, you had to actually call your friend to find out what they were up to, now all you have to do is log into your favorite site. It’s actually starting to get a little creepy!

But for those of us who aren’t spending this time telling everyone that we just got to the store and now we’re shopping and now we’re leaving and now we’re going home and now we’re watching tv……we’re using Twitter as a way to get our information out to the world–or at least to those few people that are actually following us.

What makes us different is that we feel that we’re offering a bit more value to the community. When Twitter offered the ability to search tweets, everything changed. Now you can post your tweet out in the world hoping that someone is looking for keywords that you used.

This process gives people who like what you have to say the choice of hearing more of what you have to say simply by following you.

When too much is too much

The point of this post was to tell you this story. In an effort to recruit new followers, I was duped into the idea that if you follow somebody else, they are more likely to follow you. Well, it worked, but then I ended up with over 300 spammers that I was following–minus a few legitimate users.

I’m moving right along until one day, Twitter stops me from following any more people. They actually sent me an emailing explaining how Twitter works and what it was intended for and although I can’t recite the entire email, I remember something like, it’s near impossible to follow the streams from over a hundred or so people.

It got me thinking and they were right. I logged into my Twitter account and realized there was no way I could possible read that many tweets! Shortly after, I noticed that I wasn’t even using Twitter anymore and all those people were tweeting to a brick wall.

I decided to change all that! I went back into my account and unfollowed everyone I didn’t know and I re-enabled push notifications so I can get the updates I needed from the people I wanted to hear from. Now, I won’t follow anyone just because they follow me unless I’m interested in what they have to say.

It’s just my little way of fighting the spammers. As a promise to anyone who follows me, you will not get spammed. At best, you will get some insight to my drab little life and important updates to my sites. At worst, you’ll get a daily blog post link.

After all that, if you actually want to follow me, please do so!

Out With AssociatedContent and In With Yahoo! Contributor Network

I loved the idea of Associated Content because of your ability to become your own writer, contribute something of value to the Internet community and make some money for it–that is until I realized I didn’t need this platform because I already had my own blog!

However, I joined anyway and decided to use the site as a platform for publicizing myself, which included the site you’re on now. It works really well too! I write a few exclusive articles for their site and it naturally points back to other related articles here. I make a few dollars from them and everyone is happy.

AssociatedContent.com Bought by Yahoo!

Back in May of 2010, Yahoo! announced that it was buying AssociatedContent for about $100 million and they did. That’s right around the time I joined, so I don’t really know what the site was like before, but I do know that Yahoo!’s presence at that time was very minimal. In fact, I believe the only real trace of Yahoo! besides a few mastheads here and there was the fact that you could log in using your Yahoo! username.

Anyway, as of recently, AssociatedContent has now been fully integrated into the Yahoo! Contributor Network which contains the following sites:

Yahoo! Contributor Network

One site that I was sure would be part of that group was Yahoo! Answers considering that’s another HUGE contribution site from regular web users, but oh well.

How does this change things?

It doesn’t really change anything except that it probably outdates my previous article about AssociatedContent! Thanks Yahoo!! But, generally you can still join the Yahoo! Contributor network, write to your heart’s content and make money doing it.

My recommendation is to continue using the site even if you run your own blog. One of the ways you can publish content to Yahoo! is to publish it as non-exclusive in order to be able to “legally” have it in both sites.

I think one of the only downsides to having a site like this opened up to everyone and anyone with little or no oversight (and probably less now) over the content, you tend to get a lot of inexperienced writers/bloggers out there that either don’t have the proper knowledge of a subject or simply don’t have proper command of the English language to make the content worth reading. That and you have 1000 people writing about the same topic. In fact, Slate technical writer Farhad Manjoo said:

Associated Content stands as a cautionary tale for anyone looking to do news by the numbers. It is a wasteland of bad writing, uninformed commentary, and the sort of comically dull recitation of the news you’d get from a second grader.

Get Involved

Still want to be a part of Associated Content? Great!! Let’s prove the skeptics wrong by producing quality and unique content all while building up your professional image and portfolio no matter what career path you may be on.

Here are some things you should check out if you’re still interested:

Earn Money and Build Your Reputation As A Freelance Writer

Building your blog takes time. In most cases it also takes actual writing skills and dedication to your craft to start pulling in traffic. In the meantime however, there are ways to get your content in front of viewers to use as a platform for promoting yourself and/or your website.

Think of it this way: imagine you had a website and you want to build your reputation rather fast. You come across a website that allows contributions from outside writers and you submit an article. This article is now accessible on an already existing website with a large traffic flow. When people read your article, they see your name (and profile). This information then leads to your own blog or website and instantly you become known in the blogosphere!

Ok, so maybe it’s not as easy as it sounds! But the point is, if you know your content is good and you want to get it in front of people relatively easy, this is one sure way to do it. Check out my Associated Content profile to see how people will view you.

AssociatedContent.com


AC is touted as “The people’s media company” and it is essentially a collection of over 2 million articles written on almost every topic you can think of. The best part is that these articles are written by people like you! That’s right. You are a contributor to a growing collection of content and at the same time, building a name for yourself.

To sign up, you simply need to head on over to the AssociatedContent signup page and fill out the required information. Afterward, you’ll be sent a verification email. Once verified, you’ll be taken into your account and you can start publishing content right away!

How does AssociatedContent work?

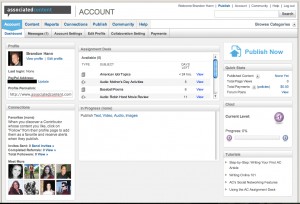
Once logged in, you’ll have access to your dashboard. It’ll look similar to this:

From here, you can do a number of different things like publish new content, check messages, edit your public profile and connect with other writers. Once you get going, this is generally how the site works:

  1. Pick the format you want (Text, Video, Audio, Images).
  2. Pick the topic that the content is about.
  3. Answer some copyright questions about how you want your work distributed.
  4. Choose a payment method.
  5. Publish your content!

Within your dashboard, you can also see a number of previously established assignments that you can choose to fulfill if you’d like. Don’t worry about writer’s block either! Associated Content will provide you with ideas if you’re stuck.

How much do I get paid?

The main payout option is Performance Payments. The rate is $1.50 per 1000 pageviews. This amount can be upped to $2.00 after certain requirements are met. This is the description of Performance Payments as outlined on the website:

Performance Payments are payments based on the traffic to your content and allow you to earn unlimited cash from your text, video, slideshow and audio submissions long after they have been published. You earn money for every one thousand page views your content generates (PPM™ rate). The baseline PPM™ rate is currently $1.50 – meaning if you generate 30,000 page views, you’re paid $45.00 in Performance Payments. As your library of content grows and your total page views accumulate, your Clout level increases. When you reach Clout 7 and beyond, your PPM™ rate will gradually increase up to a maximum of $2.00 per thousand page views. Check out the quick stats (under total payments) on your Account dashboard to see your current estimated earnings, and track your page view statistics per piece of content from the Content page. Click here to read more about the Clout system.

Another payout option is Upfront Payment. Your content is subjected to a review by the site editors and based on its originality and quality, you will receive an offer. At this point, you can choose to accept the offer or not. There are stricter rules for submitting this kind of content.

More Information

There is a LARGE amount of information you may want to peruse through before you get started, but if you’re interested in becoming a freelance writer and/or build your reputation along the way, you will love this site. For more information, please see AssociatedContent’s FAQ section.

To sign up now, go to AssociatedContent.com!

Proper Grammar and Presentation

Writing a blog or creating a website can be easy when you know what your subject is, who you plan to approach it and how often you’re going to update, but if there’s one thing that can grind your hard efforts to a stop, it would be grammar and presentation.

Among other things, grammar can make a huge impression on your professional image and ultimately make or break your site. This is especially true when you’re selling things online. Imagine if you were buying from a online retailer and their site was loaded with spelling errors, incorrect product descriptions, wrong prices or just sloppy command of the site’s language? I’m fairly certain you would be less likely to buy from them if you had a choice of purchasing somewhere else.

It’s not just grammer, but your overall presentation. I was watching a video on YouTube about just this subject and it brought up a great point about presentation. The example was about online retailers who all share the same generic item description, so if you’re shopping, you might see the same product on thousands of different sites with the same description, price and everything. At that point, what’s going to make your decision on who to buy from?

Don’t let a visitor’s decision to be narrowed down to the name or even color of your site! Let them see your site as the more professional. Chances are if you’re selling products online, you’re going to be selling something that is out there more than you can imagine, so the best way to stand out is to create a better experience. Besides, Google is aware of the massive amounts of duplicate content out there, so give them a reason to rank you higher than the rest of these sites. You wouldn’t believe how little changes to your site can affect your search engine rankings.

The same rules apply in the real world. I guarantee you’re more willing to buy a tv from Best Buy than you are from a van in the parking lot. Ok, that was an extreme example, but you get the point!

Put some time into your site. Your visitors will notice. Nobody said it was going to be easy to manage a site, but if you really want to bring yourself forward in a sea of millions, that’s the only way you can do it. At least initially. As time goes on, you’ll gain more power and leverage, allowing you to accomplish more with less.