That title might sound scary, but all of these things can only help your search engine rankings and improve the visual appeal of your website on Google. Let’s take a look at each one and then we’ll get into how to implement them on your site. The example site used in this article is my own and as you might already know, I’m using WordPress. Since this is more of an informative post as opposed to an actual guide, you should be able to add these items on any other blogging platform or CMS.
Google+ Author Link
Let me say first that if you don’t already have a Google+ account, you really need to set one up. Even if you don’t plan on using it as much as Facebook, get one so you can at least get your website more connected on the web.
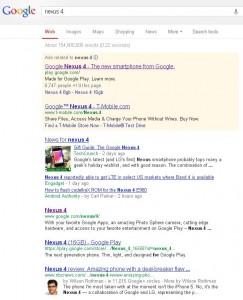
 The purpose behind the author link is to tell Google that you are the author of the content being ranked in the search results. The single most important reason for this is so you can verify your content to the world. This not only helps Google weed out the plagiarists, but it also helps to single you out on the results page. Take a look at the image to the right to see a sample search I did on Google for “nexus 4.” If you’re like most people, there are two search results that probably stood out more than anything else. One of them is for TechCrunch and the other is for William Rothman. Both of these articles are benefiting from having the Google+ author link connecting their websites to their Google+ profile.
- On your posts, modify (or create) the link from your full name so it links to your Google+ profile, but add ?rel=author to it. For example, my link looks like this:
<a href="https://plus.google.com/114683976907069457614?rel=author">Brandon Hann</a> - Head on over to your Google+ account and add a new link under the section “Contributor to”
- Make sure this link matches exactly. For example, I put www.ledfrog.com because if I put ledfrog.com, it won’t match.
Those are the basic steps to making this connection, but if you’re using WordPress, it gets even easier! Just download the Google Plus Author Information plugin. This will create a new field in your user profile for inputting your Google+ link. By doing that, it also replaces the link associated with your name on all posts with your Google+ link and adds the proper link relationship. The other advantage for using the plugin is if you have multiple authors on your site, each one can have their own link within their user profile and have it reflect properly without any manual editing.
Google+ Publisher Link
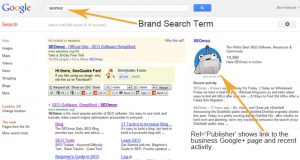
 Similar to the author link above, the publisher link also creates a cohesion between your website and Google+, but this time the link connects to a Google+ page. Just like on Facebook, you can have a profile and a page with Google+. The difference between the two is that profiles can have friends in their circles and pages can only have followers.
To create a Google+ page,
- On your Google+ profile, click Pages at the bottom of the menu on the left.
- Click on Create New Page and choose a category.
- Fill out the necessary information and save.
- When you add a link to your company (or blog) website, click Verify Link.
- Add the following code to an area on your site. If you use WordPress, add it to your header or footer so it appears on all pages and posts.
<a href="https://plus.google.com/[yourpageID]" rel="publisher">Find us on Google+</a>
If you don’t want to have an actual link on your site, you can use the span tag to implement the link on your site without the text itself. I found a great guide on how to complete all the steps required for your site automatically. Since there doesn’t appear to be a WordPress plugin yet, this is the best way to implement the required code. Check out the Google+ Publisher guide at MarketingTechBlog. This guide also outlines the manual steps of adding authorship links if you’re not using a plugin.
Google doesn’t provide any information on when these changes will take effect, but it’s commonly believed that a Google+ page has to have a significant amount of followers in order to be placed in the publisher section. But it doesn’t hurt to have everything set up while you’re building up your follower list!
hAtom Feeds
According to Wikipedia, hAtom is defined as:
hAtom is a draft Microformat for marking up (X)HTML, using classes and rel attributes, content on web pages that contain blog entries or similar chronological content. These can then be parsed as feeds in Atom, a web syndication standard.
 To Google, this is important information that can be used to show rich-text snippets in the search results. Along with the authorship connection made above, using the correct hAtom information is key to helping Google display basic information correctly. As a WordPress user, sometimes not everything is properly constructed when dealing with themes and whatnot, so here’s another quick fix to help you reduce or eliminate all errors on your site’s posts.
To begin, run a scan on a specific page on your site using the Google Structured Data Testing Tool found in your Google Webmaster Tools account. If you have no errors, great! You might be able to skip this step. However, many people are having these three common issues:
1. Warning: Missing required field “entry-title”.
2. Warning: Missing required field “updated”.
3. Warning: Missing required hCard “author”.
All three of these issues are very easily fixed. Go to your WordPress admin and open the theme editor. Begin editing your single.php file or whatever filename your theme chose for the posts on your site. Follow the follow steps:
- Find <?php the_title(); ?> and wrap it with a new span class, like this:
<span class="entry-title"><?php the_title(); ?></span> - Find <?php the_time(‘F d, Y’) ?> (may also be listed as <?php echo get_the_date();>) and wrap it with:
<span class="date updated"><?php the_time('F d, Y') ?></span> - Find <?php the_author(); ?> (or some variant of that) and wrap it with:
<span class="vcard author"><span class="fn"><?php the_author(); ?></span></span>
Once you save this file, re-run the test with Google again and you should see these errors gone!
Tying it all together
As mentioned before, getting all of these connections made does not guarantee any of your results will be enhanced overnight, but doing this is a great idea to keep your site organized and displaying the proper information at all times. You never know what Google will do for your search results, so it’s always best to maintain the best practices up front just in case. As for me, it took about 2 weeks for me to get the rich-text snippets and I had to do it all over again after I deleted my Google+ profile…long story on that one, but once again I’m waiting for Google to make the updates. We’ll see how well it goes this time around. I’ll post updates if anything major happens.

