WebMeUp – New Online SEO Tools

SEO has become an industry in and of itself and staying on top of it has become more of a chore than maintaining your website in the first place. There are few options in this arena and one of them is to fork over hundreds or thousands of dollars to hire SEO professionals to optimize your website and steer you in the right direction of gaining online exposure.

Or you can use the data tools that WebMeUp has put together to help you get the most granular snapshot of your website(s) possible.

WebMeUp

This online SEO service provides you with a central dashboard that displays everything you need to better optimize your website. This screenshot gives you an idea of just how much data can be found in your account:

WebMeUp

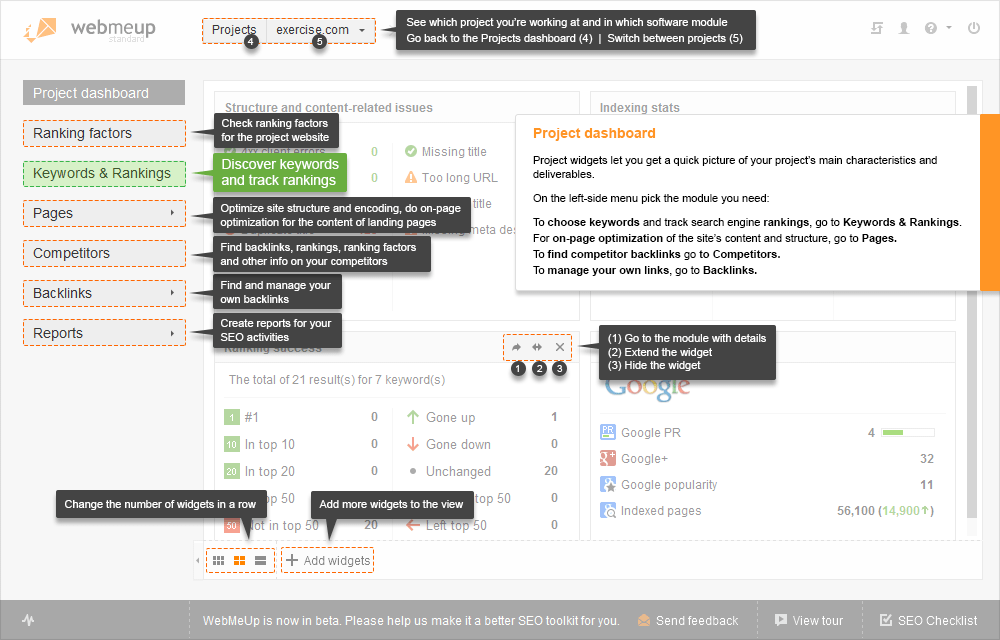
WebMeUp treats your websites as projects and depending on which plan you go with, you can have anywhere from 3 to 30 projects and up to 10,000 pages per website being crawled and monitored. I’ve been using the service for about 3 weeks now and I must say that I’m not sure how I attempted SEO before!

It’s easy to throw up a WordPress website and load it with various SEO plugins and other tools to help optimize your content, but most of these tools make changes site-wide and don’t really tell you why the changes help or more importantly, how you can use these changes to get your visitors engaged and focused on your content. When I log into WebMeUp, I’m able to see current stats on how my site appears to the major search engines and how well it’s performing on the top social networks. If there’s an error, I know about. If one of my page titles is too long, it tells me. If I have broken links, I can resolve them. And all of that is just on the first page!

Site Structure

In dealing with your individual pages, Site Structure is one of the best features due to its ability to drill down to very specific details regarding incoming and outgoing links for EACH page on your site, whether or not an image has an alt tag, what the Page Rank is for each link, is it follow or nofollow and does it provide a 301 redirect or not.

Here’s a screenshot of my own summary page:
WebMeUp Site Structure

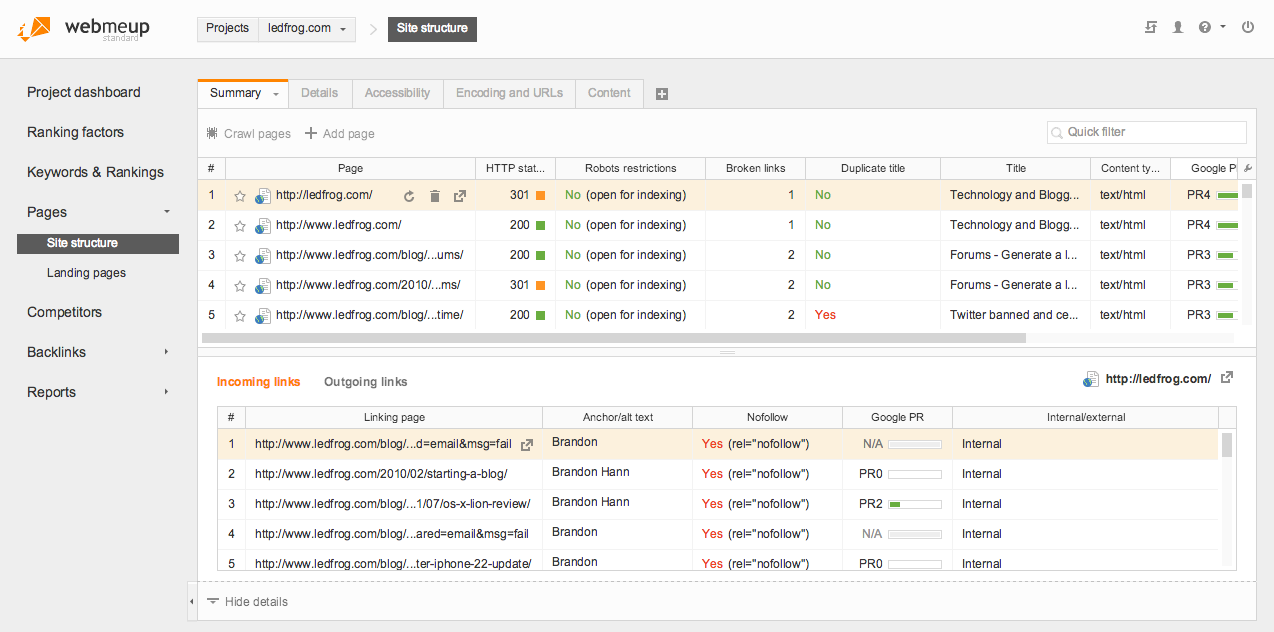
If you want to see further detail, simply click on the Details tab and you can go right into every single folder that your site has to see all pages, all links (incoming and outgoing), PR, etc. on everything! Have you ever wished you could remember which pages and posts your site links to? Have you ever forgotten how your “web” of a website is intertwined and would like to visualize the linking structure without having to go through each page manually?? This one section on WebMeUp would save you tremendous amounts of time!

More Tools

Ranking Factors – Take a quick look at your Alexa Ranking, Compete Rank, Google PageRank and overall visibility. This toolset also shows you basic domain information, whether or not your site appears in popular directory lists and how much interaction you have on social networks such as Facebook, Twitter and Google Plus.

Keywords and Rankings – This is where SEO masters will thrive! Start by adding specific keywords and phrases that are related to your site and within seconds, you can get an overview of how well you rank on the major search engines or worse, whether you rank at all. Having this tool allows you to better optimize your pages and links to gain higher rankings for your chosen keywords.

Competitors – One of the more interesting features of WebMeUp is the ability to place competitors’ websites right next to yours in just about every data report, giving you a real-world comparison between how well your site is doing and that of another website ranking close by. This tool can help you focus directly on one or more websites in an effort to maximize your results without the guesswork. Say goodbye to manual searches!

Backlinks – This section will show you all the backlinks your site has and what the PR is of each page the link is on. Now you can pinpoint where your best traffic is coming from. I was able to use the feature to find out about a related website after they linked to me on their top page. Of course, I was able to link back to them and we have since developed a partnership in which we share links and information.

My Two Cents

I’ll be the first to admit, I’m not the greatest at SEO and every time I feel I’m getting the hang of it, I notice my rankings don’t always stay near the top. SEO is a very interesting segment of managing a website of any size and one that often changes frequently and needs constant tweaking and updating. Like many of you out there, I do this site as a hobby and I don’t have the capital to spend on hiring someone full time just to keep up on SEO.

Instead, I’ve been able to use WebMeUp to keep everything organized and managed in one nice little package. It’s one thing to get someone to optimize your site or to use a free WordPress plugin that can set things up the way they’re supposed to be, but it’s another to not have the right data to know if these things are actually doing your site any good. WebMeUp isn’t free, but I can assure you that even just a few of the many features I’ve covered are worth the monthly cost, yet you will get everything and more! But seriously, don’t take my word for it…go get yourself a 2-week free trial and see what I mean.

Google+ Author and Publisher Connections With hAtom Feeds

That title might sound scary, but all of these things can only help your search engine rankings and improve the visual appeal of your website on Google. Let’s take a look at each one and then we’ll get into how to implement them on your site. The example site used in this article is my own and as you might already know, I’m using WordPress. Since this is more of an informative post as opposed to an actual guide, you should be able to add these items on any other blogging platform or CMS.

Google+ Author Link

Let me say first that if you don’t already have a Google+ account, you really need to set one up. Even if you don’t plan on using it as much as Facebook, get one so you can at least get your website more connected on the web.

Google sample searchThe purpose behind the author link is to tell Google that you are the author of the content being ranked in the search results. The single most important reason for this is so you can verify your content to the world. This not only helps Google weed out the plagiarists, but it also helps to single you out on the results page. Take a look at the image to the right to see a sample search I did on Google for “nexus 4.” If you’re like most people, there are two search results that probably stood out more than anything else. One of them is for TechCrunch and the other is for William Rothman. Both of these articles are benefiting from having the Google+ author link connecting their websites to their Google+ profile.

  1. On your posts, modify (or create) the link from your full name so it links to your Google+ profile, but add ?rel=author to it. For example, my link looks like this: <a href="https://plus.google.com/114683976907069457614?rel=author">Brandon Hann</a>
  2. Head on over to your Google+ account and add a new link under the section “Contributor to”
  3. Make sure this link matches exactly. For example, I put www.ledfrog.com because if I put ledfrog.com, it won’t match.

Those are the basic steps to making this connection, but if you’re using WordPress, it gets even easier! Just download the Google Plus Author Information plugin. This will create a new field in your user profile for inputting your Google+ link. By doing that, it also replaces the link associated with your name on all posts with your Google+ link and adds the proper link relationship. The other advantage for using the plugin is if you have multiple authors on your site, each one can have their own link within their user profile and have it reflect properly without any manual editing.

Google+ Publisher Link

Google Publisher sampleSimilar to the author link above, the publisher link also creates a cohesion between your website and Google+, but this time the link connects to a Google+ page. Just like on Facebook, you can have a profile and a page with Google+. The difference between the two is that profiles can have friends in their circles and pages can only have followers.

To create a Google+ page,

  1. On your Google+ profile, click Pages at the bottom of the menu on the left.
  2. Click on Create New Page and choose a category.
  3. Fill out the necessary information and save.
  4. When you add a link to your company (or blog) website, click Verify Link.
  5. Add the following code to an area on your site. If you use WordPress, add it to your header or footer so it appears on all pages and posts. <a href="https://plus.google.com/[yourpageID]" rel="publisher">Find us on Google+</a>

If you don’t want to have an actual link on your site, you can use the span tag to implement the link on your site without the text itself. I found a great guide on how to complete all the steps required for your site automatically. Since there doesn’t appear to be a WordPress plugin yet, this is the best way to implement the required code. Check out the Google+ Publisher guide at MarketingTechBlog. This guide also outlines the manual steps of adding authorship links if you’re not using a plugin.

Google doesn’t provide any information on when these changes will take effect, but it’s commonly believed that a Google+ page has to have a significant amount of followers in order to be placed in the publisher section. But it doesn’t hurt to have everything set up while you’re building up your follower list!

hAtom Feeds

According to Wikipedia, hAtom is defined as:

hAtom is a draft Microformat for marking up (X)HTML, using classes and rel attributes, content on web pages that contain blog entries or similar chronological content. These can then be parsed as feeds in Atom, a web syndication standard.

hAtom feed sampleTo Google, this is important information that can be used to show rich-text snippets in the search results. Along with the authorship connection made above, using the correct hAtom information is key to helping Google display basic information correctly. As a WordPress user, sometimes not everything is properly constructed when dealing with themes and whatnot, so here’s another quick fix to help you reduce or eliminate all errors on your site’s posts.

To begin, run a scan on a specific page on your site using the Google Structured Data Testing Tool found in your Google Webmaster Tools account. If you have no errors, great! You might be able to skip this step. However, many people are having these three common issues:

1. Warning: Missing required field “entry-title”.
2. Warning: Missing required field “updated”.
3. Warning: Missing required hCard “author”.

All three of these issues are very easily fixed. Go to your WordPress admin and open the theme editor. Begin editing your single.php file or whatever filename your theme chose for the posts on your site. Follow the follow steps:

  1. Find <?php the_title(); ?> and wrap it with a new span class, like this: <span class="entry-title"><?php the_title(); ?></span>
  2. Find <?php the_time(‘F d, Y’) ?> (may also be listed as <?php echo get_the_date();>) and wrap it with: <span class="date updated"><?php the_time('F d, Y') ?></span>
  3. Find <?php the_author(); ?> (or some variant of that) and wrap it with: <span class="vcard author"><span class="fn"><?php the_author(); ?></span></span>

Once you save this file, re-run the test with Google again and you should see these errors gone!

Tying it all together

As mentioned before, getting all of these connections made does not guarantee any of your results will be enhanced overnight, but doing this is a great idea to keep your site organized and displaying the proper information at all times. You never know what Google will do for your search results, so it’s always best to maintain the best practices up front just in case. As for me, it took about 2 weeks for me to get the rich-text snippets and I had to do it all over again after I deleted my Google+ profile…long story on that one, but once again I’m waiting for Google to make the updates. We’ll see how well it goes this time around. I’ll post updates if anything major happens.

Google's New +1 Button

Google has launched a new feature for search results called the +1 Button. It works like a recommendation button where you can click +1 on a particular website or webpage to help others know that it’s been recommended. If you’ve used sites like Digg.com, you know how this process works. Basically, after you’ve read some content on a website and decided you liked it, you click the +1 Button and it helps other web users by ranking your site/content like a score card. In turn, websites and web pages with higher “votes” can potentially gain higher rankings on Google search results pages (SERPs).

Adding the +1 Button to your site

After logging into my AdSense account, I was greeted with this lovely message:
Google +1 Button AdSense message
From there, I clicked on the link that took me to the code page where I had a choice of 4 different sizes for the icon as well as some other advanced settings. I didn’t spend too much time on this page as I wanted to get the button on my site ASAP! I simply chose the standard size and left everything else the same.
Google +1 Button
The code was easy to implement. In WordPress:

  1. Open your theme editor and begin editing header.php
  2. Find the </head> tag and place the code: <script type=”text/javascript” src=”https://www.ledfrog.com/content/images/2011/06/plusone.js”></script> right above it.
  3. Save header.php
  4. Begin editing single.php (if you want the button to appear on each post)
  5. Find the area you want the button to show up. On my site, I placed it right before the content starts so it’s at the beginning of every post.
  6. Place this code: <g:plusone></g:plusone> before <?php the_content();
  7. Save single.php

Now that you have all the code in place, go to one of your blog posts and verify that it’s showing up.

What’s Next?

Well as with any traffic-related feature on your site, all that you really can do now is wait. If the users want to vote up your content, they now have the option to do so within Google directly. If you find that you’re not getting a lot of response from this feature, try moving the button around your site to see where it works best.

The purpose of this feature is to help web users find valuable content as ranked by other web users that have already seen what you have to offer. This helps Google in their never-ending quest to filter out junk sites and sites with little to no content while pushing more valuable sites up to the top of the SERPs. Let’s just hope that this feature doesn’t get abused like so many other Google features have been in the past!

What can BlogGlue do for you?

UPDATE: BlueGlue is no longer in service. Per an email I received yesterday, the company running BlogGlue has decided to shut down the service and seek some sort of buyout. It’s possible that this service could be resurrected under a new owner, but I wouldn’t hold my breath. It was fun while it lasted! I’m leaving this article up for historical purposes, but will be removing all outgoing links. This was the email sent out to all users:

BlogGlue Closed

Original article:

Just over 1 year ago, I joined a little known website called Arkayne. I even wrote about how to drive focused traffic to your site with Arkayne being the central topic. The purpose of Arkayne was to enhance your blog’s presence by connecting the posts you create with other blog owners who write about similar topics. It was such a simple concept; one that has helped my site grow in ways I didn’t think were possible. Today, Arkayne is now BlogGlue and their concept has remained simple, but has become much more powerful.

For me, blogging isn’t about ranking high in search engines or making thousands of dollars a day selling useless information or products—it’s about sharing ideas and providing valuable information about the things I know with people who want to learn. Of course, if I made thousands of dollars doing this, that would be great, but I don’t intend to sacrifice quality for quantity. This is where BlogGlue really helps out.

BlogGlue Partnerships

The give and take process of BlogGlue starts with a recommendation. As you browse the ever-growing community of blogs, you’ll start noticing many websites that share some common interests with your site. As you click through each one, you can choose the ones you like based on how well they complement your site and submit a recommendation.

The site owners you recommended are then notified of your recommendation and have the option to review your site. If they like what they see and recommend you back, you both become partners. At that point, your blogs are linked.

The plugin

The BlogGlue plugin on your site will add Related Links at the bottom of each post. It gets these links from your partners, so it’s important not to just add every partner under the sun to increase your count. Your site, your partners’ sites and your visitors will all benefit from these partnerships.

The process works both ways as well. Your links will start appearing on partner’s sites in the same location. This is the main function of BlogGlue and it works really well! The more partners you have, the most choices the plugin will have in pulling quality content. And as you would imagine, if you don’t like a particular site’s content, simply delete them as a partner and their links will never show up again!

When writing a post, the plugin also offers some instant help with basic SEO tips. After you saved your first draft, you can click the Test Now button and see exactly what you might be missing and how you can improve the page’s optimization.

The costs

There are three service plans available.

  • Free – $0.00/month – You accept up to 5 partners, but you can have unlimited recommendations. Your site content is limited to 200 pages/posts.
  • Basic – $9.97/month – You can have up 15 partners and still have unlimited recommendations. Your site content is limited to 1000 pages/posts.
  • Unlimited – $19.97/month – You can have unlimited partners and unlimited recommendations. Your site content is limited to 5000 pages/posts.

The best part about these plans is that you can grow into them. Start out free and as you start to notice your traffic increasing, just upgrade instantly to the next plan. At some point, your site will be getting hundreds or thousands of hits a day and the unlimited plan will be needed, but you’ll likely be making money at that point!

There are no contracts, hidden fees, cancellation charges, upgrade charges, taxes, etc, etc.! What you see is what you get.

My two cents

I’ve been using BlogGlue for over a year now and I can tell you just by looking at my stats, they have helped my site grow almost 300% and the numbers continue to rise as I become partners with more and more quality blogs. Their customer support has been super gracious and exceptionally fast with any issues I’ve had and I haven’t had many…that’s for sure.

I can’t say enough great things about the operation they’re running over there. Check them out over at www.blogglue.com.

Google's New Panda Algorithm Changes The Face of Search Rankings

In Google’s never-ending effort to rid their indexes of low or no-quality websites while boosting rankings for higher-quality sites, they have launched a new algorithm focused primarily on user feedback. As a publisher myself, this is a very important change. However, since I don’t practice in any deceiving tactics in order to boost my own traffic, I’m not too worried about it. As always, with any site that I write for or work on, what you see is what you get.

For those who have spent lots of time and other resources on building worthless websites, ripping content from higher quality sites, participating in link farms or any other form of “search fraud”, you can probably kiss your work goodbye. At this point, it’s only a matter of time until you lose your foothold and/or become removed altogether.

What did Google change?

To put it as simply as possible, Google changed the way it ranks websites. Before, it was all about keywords, how those keywords related to content, links and other factors. As of a month ago, it’s more about user opinions on particular sites. Essentially these are user feedback signals that can affect how well a site will rank compared to others of similar content. The goal for this change is to allow users (in time) to generate the popularity of the search results. While this may seem like a good plan on the surface, adding any human element of this magnitude can possibly carry some negative side effects:

  1. Some users mistake low-quality sites for high-quality sites and vote accordingly. For example, a person who has always gotten their “news” from AssociatedContent.com might feel like it’s more authoritative than Msn.com, thus making MSN rank lower.
  2. DoS-type attacks. I don’t know of any way to stop someone from creating some kind of bot that allows them to “vote down” targeted websites in hopes of getting their own site ranked higher.

More local search results

Another major change is the localization of results. For those of you who have some type of Google account, be it iGoogle, Gmail, AdSense, etc., you are already aware of how specialized the search results are for you based on a number of things like your previous searches, but this new update brings up more related results to your area based on your Internet connection.

Granted, this is helpful when you’re looking for local businesses or places to eat, but what about if you’re looking for national or international businesses? The Internet was designed to connect you to the world and some of the main reasons most people use it is to find those obscure places to buy products or to get information you can’t get locally. So what happens? Well, those results are more likely to get drowned out down into the next couple of pages.

The upsides

If you’ve built an all-original site and have continued to update it without the use of shady tactics aimed at gaining your higher search results, then you generally have nothing to worry about. In fact, these changes might actually help your site because it’ll clear out most of the junk that is probably ranking higher than you right now.

If you’re just a Google user, then these changes will help you dramatically because over time, the results you see will be based on what other people have said about a particular site and how great they felt the content was. Plus, we should be able to kiss the days when any search would pull up 20 spam sites goodbye!

My two cents

My one tip of advice: don’t write content just to get more traffic! Always write with the user in mind. Trust me on this. It will take longer to do and cause you to spend more time researching, but it will pay off greatly in the end. You can play the SEO game until you’re blue in the face, but what’s it all worth if you spend countless hours and money getting all this traffic to your site only to have Google make one simple change down the road that causes your site to lose 75% of your efforts?!

Use SEO as a way to make your already-great content shine even more. Don’t use it to just to play the ranking game. The best side-effect of this approach is that Google will never penalize great, original websites, so you’ll never have to worry about another Google update!

Social Bookmarking – Sphinn

Sphinn is a concept site that specializes in discussing Internet marketing and news. One of the major advantages of using and being on this site is that it allows you to take part in discussions and network with similar people in your specific field.

How can Sphinn help my site?


If you’re running a blog, Sphinn can give you an advantage over other site owners. Just like most of the social networking site I’m covering in this section, you are able to submit articles and news related to your topic of choice. Naturally, these articles link back to your own website where you are currently marketing yourself or your products.

  • Publish original articles – When you publish original content, submit it to Sphinn so you can start building web traffic that you need for your site. The more original and fresh your content is, the better it’ll rank.
  • Discuss – As a member of Sphinn, you can jump into a conversation about any item on the site. This creates a very interactive experience.
  • Network – Meet other users in the same industry as you and talk about topics that are of interest. You can also add these people to your contacts list.

Is Sphinn for you?

As mentioned above, this site is only for content related to Internet marketing, SEO and making money online. If your site does not fall into one of these categories, Sphinn will not be able to help you out.

<< Back to MySpace Forward to Facebook >>

What is the "rel=nofollow tag"?

When it was introduced by Google, a lot of people were skeptical of it’s purpose. It is generally believed to have been created for the sole purpose of controlling how a website’s PageRank is shared among external links. As an example, if your website has a PageRank of 6, every external link you have on your site will get a piece of your high score, which means one link from you might be worth 10 times that of a single link from a PageRank 1 site.

Now, I don’t have all the numbers and nobody really knows for sure what the exact formula is, but that’s the general idea. Higher PageRank sites are considered “authorities” on their subject matter and are therefore granted with the ability to make other sites more important in terms of search rankings. The thought process behind this is that the high PageRank site is a legitimate site with actual, helpful information and in turn, they are rewarded for their quality contributions to the Internet. Google then realizes that if these site’s are going to link to someone else, they must be serious about it, so they allow the PageRank to “flow” to the next location.

What exactly is it?

The tag is used in a link such as this:

a href="https://www.ledfrog.com/links/" target="_blank" rel="nofollow">Click here.

It tells Google that this link can be followed (meaning the GoogleBot will go to that page and crawl everything there), but it does not have to take into account the PageRank score of the referring site. Other search engines take the meaning literally and do not even go to the site. I believe Ask.com is the only site that simply ignores the tag completely.

So, where does the rel=nofollow tag fit in? The first automated occurrence of this tag can be noticed on most blogs out there–more specifically, the comments section. It’s true, if you thought that by running around the Internet, posting comments on other blogs in hopes that all those website links were creating backlinks to your site, you were wrong (most of the time)!

There actually are two valid reasons for doing this to blog comments. The first one is obviously spam. I can’t even begin to tell you how much spam comments I get on my site each day and my site isn’t a high traffic site so far. Spammers in this sense will generate some very generic comments for a random posting on your blog and somewhere within the comment or attached to their name will be one or more external links. The second reason for doing this is that you might not want to be passing on your PageRank to sites that are completely unrelated to your site as this, in time, may actually cause your own score to go down.

My view on this is I don’t use the rel=nofollow tag on my post comments for two reasons. One, spammers don’t get through on my site. I use the Akismet plugin and it stops almost everything! When it doesn’t, the comment sits in queue and waits for my approval anyway, so what do I care? The second reason is that I feel when someone makes a comment on my site, they are taking the time to contribute an opinion of some sort and the sheer fact that they were even on my site usually means they run a blog that’s similar in content, so I give them some credit.

The rel=nofollow tag that was supposed to help with spam and the degradation of PageRank has now become a useful tool in the art of PageRank Sculpting. In the coming days, I’ll be going over more about PageRank and SEO tips to maintain control of your external links.

I recently found a blog post that discussed this topic more in depth, including a blurb about the opposite for no-follow called do-follow. If you want to read more about these tags, check out Jack Nguyen’s blog post.

How do you get links?

Getting those links that will pay out the oh-so-important “link juice” can be a difficult task. I wrote an article describing 10 ways to increase traffic to your blog and while these tips will most certainly pony up the links, one thing to remember is link building takes time. The normal way of doing this is a perfect balance of creating great content that other sites will link to automatically and getting out there and literally trading links.

However, there are services out there that can help you build your links. Professional link building services can save you the time and frustration of having to go out all over the Internet and round up links by yourself. They can also tailor linking campaigns specifically for your website–something that you may not have the time to do. This way you can guarantee that the links you’re getting aren’t simply random, unrelated websites.

Ultimately, as enough time passes by, the amount of links that your website obtains will grow. As long as you keep creating great content and providing services and information that people want, your site will grow as well.

How to write perfect web page titles

Ok, so perfect might be too strong of a word, but the point is that most people mistake the title of a particular web page to be the same as the main title of their site. Unless ALL of your web pages have exactly the same content on them, this is not the case.

I like to think of it like this. Let’s say you’re a book publisher called Ledfrog Publishing. You want to publish three books with these subjects: ‘making money online’, ‘how to play the game of soccer’ and ‘how to make a website’. Now you want to title them, so naturally you come up with “The Ultimate Guide to Making Money Online”, “Playing The Game of Fútbol” and “Create a Website in 10 Minutes”. These are all great titles because people would know exactly what they’re getting into just by looking at the cover. What you wouldn’t do is name them all “Ledfrog Publishing”, right?

If that came so naturally to you, then why are you making simple mistakes when naming your webpages?! I’m not yelling at you, but I am here to help! For the record, the reason people make these mistakes is because they think of their website as being one giant book and therefore, as long as they name the site correctly, every “page” within should follow a natural order.

Well this is true if everybody who came to your site stopped off at your homepage and then navigated through it page by page from there. However, I can almost bet that most of your traffic comes from a search engine and visitors likely found it by clicking on a keyword they searched for. What this means is that they landed at your site on some random “page in your book” and unless they click on something else, they are completely unaware of your site!

So instead of your site being a giant book, think of it as being the publisher and all the books are the web pages within. This will help you think of creative (and valuable) titles for each page.

I found a great guide online for creating titles and I wanted to summarize the process here. Remember that search engine optimization is extremely important to your site and it will dictate how much traffic you get.

What is a title?

Go to Google, do a search on anything you want and when you look at the results, you’ll see the blue titles that provide the text that’s closely related to your search. Try a few searches and even switch the keywords around a bit. You’ll notice that the results drastically change based on a few changes. This is because one site or another has written a title that better matches your search query. A title rests within the HTML code and is often overlooked by a web designer.

How do I write an effective title?

Read your page before you post it online. Read it twice if you have to. Start extracting keywords that summarize that page and write them down. You can even write down the most commonly used keywords. Once you have a nice list, start creating 60 character titles that match those keywords. Don’t just list them. As a helpful tool, search for high-ranking sites that have similar content and see how they’re naming their pages. You don’t want to copy them, but get an idea of the format.

Remember that you will be ranked for the words you use in your titles. If you start adding words like: about us, contact me, home, etc. you’re going to be ranked for those words first and not for the content of your site. This is another reason not to name every page the same as your site’s title.

Why do some sites consistantly rank high?

As with all other SEO tips, no one trick works alone. You need a combination of great titles, original content, good keywords, backlinks and regular updates to keep your site ranking high. As a result, some sites hit the nail on the head for more than one SEO category and that usually explains why they’re always at the top.

There’s really not much to it once you change your thought process on what a title’s function is and how it relates to your page. The goal is to show the usefulness of the page to Google and your visitors. The last tip I can give you is take a look at your titles and ask yourself if you would click on your own site if you saw it pop up on Google.