Google+ Author and Publisher Connections With hAtom Feeds

That title might sound scary, but all of these things can only help your search engine rankings and improve the visual appeal of your website on Google. Let’s take a look at each one and then we’ll get into how to implement them on your site. The example site used in this article is my own and as you might already know, I’m using WordPress. Since this is more of an informative post as opposed to an actual guide, you should be able to add these items on any other blogging platform or CMS.

Google+ Author Link

Let me say first that if you don’t already have a Google+ account, you really need to set one up. Even if you don’t plan on using it as much as Facebook, get one so you can at least get your website more connected on the web.

Google sample search
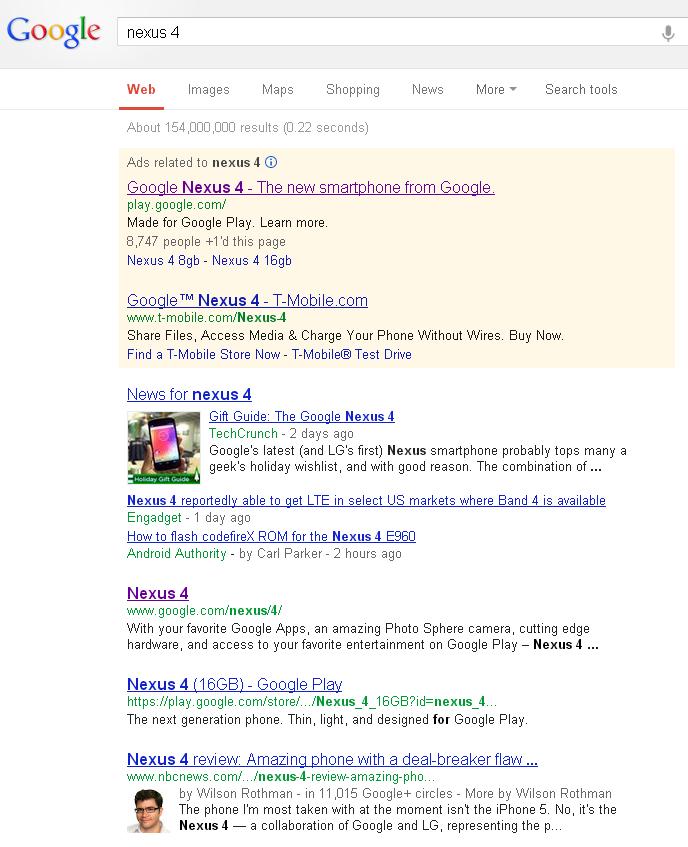
The purpose behind the author link is to tell Google that you are the author of the content being ranked in the search results. The single most important reason for this is so you can verify your content to the world. This not only helps Google weed out the plagiarists, but it also helps to single you out on the results page. Take a look at the image to the right to see a sample search I did on Google for “nexus 4.” If you’re like most people, there are two search results that probably stood out more than anything else. One of them is for TechCrunch and the other is for William Rothman. Both of these articles are benefiting from having the Google+ author link connecting their websites to their Google+ profile.

  1. On your posts, modify (or create) the link from your full name so it links to your Google+ profile, but add ?rel=author to it. For example, my link looks like this: <a href="https://plus.google.com/114683976907069457614?rel=author">Brandon Hann</a>
  2. Head on over to your Google+ account and add a new link under the section “Contributor to”
  3. Make sure this link matches exactly. For example, I put www.ledfrog.com because if I put ledfrog.com, it won’t match.

Those are the basic steps to making this connection, but if you’re using WordPress, it gets even easier! Just download the Google Plus Author Information plugin. This will create a new field in your user profile for inputting your Google+ link. By doing that, it also replaces the link associated with your name on all posts with your Google+ link and adds the proper link relationship. The other advantage for using the plugin is if you have multiple authors on your site, each one can have their own link within their user profile and have it reflect properly without any manual editing.

Google+ Publisher Link

Google Publisher sample
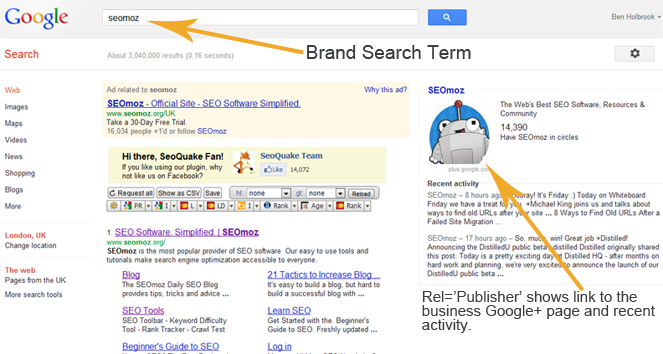
Similar to the author link above, the publisher link also creates a cohesion between your website and Google+, but this time the link connects to a Google+ page. Just like on Facebook, you can have a profile and a page with Google+. The difference between the two is that profiles can have friends in their circles and pages can only have followers.

To create a Google+ page,

  1. On your Google+ profile, click Pages at the bottom of the menu on the left.
  2. Click on Create New Page and choose a category.
  3. Fill out the necessary information and save.
  4. When you add a link to your company (or blog) website, click Verify Link.
  5. Add the following code to an area on your site. If you use WordPress, add it to your header or footer so it appears on all pages and posts. <a href="https://plus.google.com/[yourpageID]" rel="publisher">Find us on Google+</a>

If you don’t want to have an actual link on your site, you can use the span tag to implement the link on your site without the text itself. I found a great guide on how to complete all the steps required for your site automatically. Since there doesn’t appear to be a WordPress plugin yet, this is the best way to implement the required code. Check out the Google+ Publisher guide at MarketingTechBlog. This guide also outlines the manual steps of adding authorship links if you’re not using a plugin.

Google doesn’t provide any information on when these changes will take effect, but it’s commonly believed that a Google+ page has to have a significant amount of followers in order to be placed in the publisher section. But it doesn’t hurt to have everything set up while you’re building up your follower list!

hAtom Feeds

According to Wikipedia, hAtom is defined as:

hAtom is a draft Microformat for marking up (X)HTML, using classes and rel attributes, content on web pages that contain blog entries or similar chronological content. These can then be parsed as feeds in Atom, a web syndication standard.

hAtom feed sample
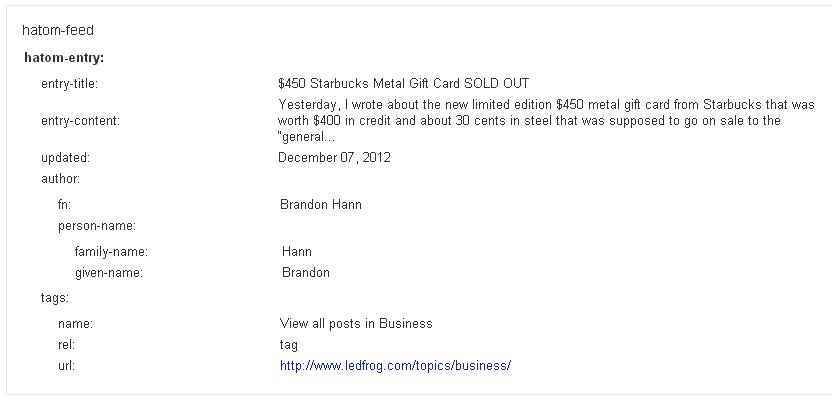
To Google, this is important information that can be used to show rich-text snippets in the search results. Along with the authorship connection made above, using the correct hAtom information is key to helping Google display basic information correctly. As a WordPress user, sometimes not everything is properly constructed when dealing with themes and whatnot, so here’s another quick fix to help you reduce or eliminate all errors on your site’s posts.

To begin, run a scan on a specific page on your site using the Google Structured Data Testing Tool found in your Google Webmaster Tools account. If you have no errors, great! You might be able to skip this step. However, many people are having these three common issues:

1. Warning: Missing required field “entry-title”.
2. Warning: Missing required field “updated”.
3. Warning: Missing required hCard “author”.

All three of these issues are very easily fixed. Go to your WordPress admin and open the theme editor. Begin editing your single.php file or whatever filename your theme chose for the posts on your site. Follow the follow steps:

  1. Find <?php the_title(); ?> and wrap it with a new span class, like this: <span class="entry-title"><?php the_title(); ?></span>
  2. Find <?php the_time(‘F d, Y’) ?> (may also be listed as <?php echo get_the_date();>) and wrap it with: <span class="date updated"><?php the_time('F d, Y') ?></span>
  3. Find <?php the_author(); ?> (or some variant of that) and wrap it with: <span class="vcard author"><span class="fn"><?php the_author(); ?></span></span>

Once you save this file, re-run the test with Google again and you should see these errors gone!

Tying it all together

As mentioned before, getting all of these connections made does not guarantee any of your results will be enhanced overnight, but doing this is a great idea to keep your site organized and displaying the proper information at all times. You never know what Google will do for your search results, so it’s always best to maintain the best practices up front just in case. As for me, it took about 2 weeks for me to get the rich-text snippets and I had to do it all over again after I deleted my Google+ profile…long story on that one, but once again I’m waiting for Google to make the updates. We’ll see how well it goes this time around. I’ll post updates if anything major happens.

Multiple WordPress Multi-User Installations

I’ve scoured the Internet looking for the answer to this question and I have found it. The question was, can you you install multiple WordPressMU blogs and have them run under one webhost. The short answer is no. However, as with most things in the online world, it is possible with the right “tool”.

If you’re wondering why I would want to have two separate installs of this, it’s because I have more than one client on my web server, each of which are running their own sites. This is fine for most applications, but when you start dabbling in things like SSL certificates and wildcard sub-domains, that’s when the trouble starts. These are just two items that require their own IP address.

One of my clients would like to run multiple blogs on his WordPress Network, but because I’m already doing that for Ledfrog.com, I’m essentially blocking him from doing so. This is because Ledfrog.com is the main domain on my server and any changes utilizing different ports such as 443 for SSL certificates or services like WordPressMU that use wildcard sub-domains have to go through the server’s IP address and since this IP is assigned to my domain, his will not work.

The way WordPressMU works is once you convert your WordPress install into a network, you have the ability to add new sites to it. These sites utilize all of the main structure of the original WordPress installation while creating a separate blog directory inside the wp-content folder to store all of that blog’s specific files such as media uploads and so forth. Plugins and theme are then made available to all sites provided that you (the network admin) have made them available. The advantages here are that you no longer have to install a whole new copy of WordPress, create a new database, download all the same themes and plugins or manage different webhost accounts every time you want to start a new blog. Everything except the media files are shared. You can imagine how much faster updates are too!

Anyway, to make this happen, you need to create a wildcard sub-domain ‘A’ record in your DNS server that points *.yourdomain.com to your server’s IP address. This is needed because when you create a new site on your network, a virtual subdomain is created. An example of this is my personal blog site, Ledfrog.me. When I created it in my network, I was actually creating me.ledfrog.com.

The real magic happens with a feature called Domain Mapping. This is where you can map a real domain (provided it’s been added to your DNS server) to any virtual WordPress site you have created. Using the same example, I was able to map the domain Ledfrog.me to my virtual blog, me.ledfrog.com, so when you access either of those URLs, you’ll wind up at Ledfrog.me. Make sense?!

WordPressMU Domain Mapping

So all this is fine and dandy when you’re working with one server, one IP address and one main domain, but in my case, another client of mine would like to create his own network. The problems begin when you try to create the wildcard sub-domain. While doing this is possible and serves a valuable function—allowing him to create his own real sub-domains—it does nothing for WordPressMU!

I’ve contacted my webhost, I’ve ran all over Google and even tried Bing out for the first time looking for some help with this and eo far I’ve found two answers. First, I keep getting sent to sets of instructions that allow you use vhost.conf files in your client’s vhost container to allow the use of a wildcard sub-domain. This process basically has you creating a conf file that you then configure into Apache to tell the server that you want it to be included into the configuration for that site. It’s great for adding site-specific features to httpd.conf without affecting your whole server.

The second answer I get is the correct one. You can’t use WordPressMU on two separate installations without an additional static IP address! To verify this, all you have to do is install it on another client on your same server and watch what happens when you try to access one of the the virtual blog sites. Here’s what it does:

Domain1.com is the main domain attached to the server’s ONLY IP address.
site2.domain1.com is a virtual blog site created inside the WordPressMU installation.
site2.com is the domain that is mapped to the sub-domain above.
If you access site2.com, you are really only looking at site2.domain1.com.

Domain2.com is in another client’s hosting account on the same server and same IP address.
site2.domain2.com is a virtual blog that’s created inside the WordPressMU installation.
If you access site2.domain2.com, you are redirected to Domain1.com with an error about registrations being closed.

The reason for that is because site2.domain2.com is being read as a sub-domain of Domain1.com!!

I hope you’re not confused. More so, I hope someone who reads this is laughing their head off because they know the way around all this. Oh and by the way, I’m not try to escape having to purchase a separate IP address. It’s just that my host won’t sell me one without a valid reason and apparently this doesn’t count because they said it’s possible to use one address!

Breaking the myth about "turnkey" websites

I was in the middle of writing a completely different article and I decided to check the status on one of my eBay items and for some reason I just decided to search for domain names for sale. I’m always curious to see what kind of junk is being sold out there for ridiculous prices.

It was right then that I noticed a “turnkey” website for sale and I must say, I was quite impressed with the ad. I mean, this thing went on and one describing every single element to the site and how it worked, etc., etc. It was laid out so nicely that I almost got sucked right in. Why not? The price was only $81 with 2 hours to spare and according to the ad, if I had 5000 visitors to my site and a 15% CTR, I’d be making about $54,000 per year!

Say what?!!

What is a turnkey website?

The concept of a turnkey…anything is simply that of a website, business or some other operation that’s all ready to go. You just jump right in and keep it going. You can equate this to opening a McDonalds–you have a large corporation that essentially sells itself and all you need to do is manage the day-to-day. Sounds easy enough, right?

Well, it is and it isn’t as anyone who runs a business will tell you! The problem with turnkey websites is that a website can looking phenomenal online, have tons of content, videos, links and blog posts, but not be exactly what it claims. This is more true than ever before thanks to software like WordPress, Drupal and other CMS packages.

With this software, you can build a great looking site in literally 7 minutes (the 5-min WordPress install, plus 2 minutes to upload a theme).

Misleading ads

Like I mentioned above, this guy’s ad covered everything:

  • Professional design
  • Fully automated and maintenance free
  • Valuable domain name included
  • Established website
  • The site store updates by the minute
  • Profitable income streams from AdSense, Amazon and ClickBank

That last one is the one I really want to draw attention to. Whenever you tell someone that the thing they’re buying has “profitable income streams…” and you ad posts projected numbers without so much as saying these results are not typical, you’re misleading your customer.

In my opinion, you’re feeding off desperate people. Maybe the bad economy has hit some people really hard, so they’re out there trying to make some extra money. They come along and see this and get the impression that this site is already making money and because it’s “turnkey”, all they have to do is promote it a little bit and off they go!

The truth

This particular ad is nothing new. I’ve seen these pre-made sites for sale for many years. But if you were to calculate exactly what you’re getting, you may think twice about bidding. Let’s break it down:

  1. Professional design: Listen up folks…WordPress is FREE and there are THOUSANDS of free themes out there that can make your site look “professional”.
  2. Fully automated: How can anything be fully automated? Even running an autoblogger takes time to manage and maintain! The best part is in the very same ad, this guy tells you all you have to do to make this site work is to promote and advertise. So much for fully automated.
  3. Valuable domain: This of course falls within your own opinion. The domain in the ad I’m referring to is: CookingAndRecipeInformer.com. Valuable? Not in my opinion.
  4. Established website: Doesn’t this imply that the website is already operational? Of course it’s online, but the way I take it is that it’s already doing what it claims to do: make money.
  5. The store updates by the minute: This is an easy task given that the store is nothing more than an Amazon store imported into your WordPress theme. Anyone who’s an Amazon Associate knows that this task is much too easy.
  6. Profitable income streams: This is a loaded statement because it doesn’t mean this site is actually profitable, but that it can be. But, this is so obvious it’s funny! Anything in theory can be profitable if promoted correctly. In fact, this portion of the turnkey site is by far, the hardest. If you run a website, you know how difficult it can be to get traffic.

Ok, so now that I got that all cleared up, lets total it up:

Domain name ($9.99) + WordPress software ($0) + Pro Theme ($0) + Amazon store ($0) = $9.99

This auction is worth about $10 and that’s even if you thought that domain name was worth the registration fee. Think about this before you get lured into purchasing a domain name with a turnkey website. Also, remember that you have to host the site somewhere, so you can figure about another $10 per month.

My two cents

If you think your winning bid is worth having all this set up for you, then by all means, purchase it, but don’t think you’re getting some established business. Always read the fine print and do some Google searching first. Look for keywords in the ad that might pinpoint how theses sites are created and see if you can create something yourself without having to spend a lot of money.

Lastly, if you’re really interested in purchasing an established website, you’ll want to check out Flippa.com. They offer legitimate businesses for sale and they can prove their worth by showing you traffic results and income reports. Good luck in your business ventures!

Web 2.0 – MyBlogLog

This one is mainly for those running blogs. However, this doesn’t limit you to personal blogs. A lot of businesses are now using blogs to promote and sell products. If you can imagine a Facebook geared specifically for blog sites, then MyBlogLog is what you get.

What is it?

MyBlogLog is now a Yahoo! service after being acquired in 2007 for around $10 million. Blog owners can download a widget to put on their blog that connects other blog owners with each other based on content and keywords. When you create your free account, you are creating a blog community for your listed blog(s). This community is then searchable, shareable and subscribe-able by all users of MyBlogLog. See what I mean by going to my MyBlogLog community–you can join right from this page.

This service is a great tool to continue spreading the word about your site. One thing I really like about sites like this and Technorati is that they are designed for bloggers. Getting listed in Google is great, but your site is thrown in with the masses and is compared to all other web-types out there. When your blog is within a blogging community, you’re undoubtedly going to be better embraced.

Widgets

There are website widgets available to place on your website that extend your site’s functionality for your account. Widgets allow you to display recently viewed pages on your site as well as recent members who visited your blog. This allows you to show your MyBlogLog visitors to your own visitors. All links are based on related content and doing this creates a much deeper network within the community.

Another widget, which is actually a WordPress plugin, called Just for You goes a step further in connecting people based on interests. What’s really cool about this one is that it displays related content on your site based on whether that visitor is a MyBlogLog member or not. If your visitor is a member, they’ll get to see related posts on your site based on the tags they have in their account. If they’re not a member, they will see related posts based on recent member’s tags.

Other widgets allow you to display your current statuses and updates to your blog alongside countless other services and features that you integrate into your MyBlogLog account.

My two cents

The goal for your blog or any website that you’re building is to get it out in the world as much as possible without spamming or doing other “shady” practices. This site allows you to just add one more way to get your content in front of others that are looking for it.

If you’re looking for another similar service that is not part of this series, check out my article on Arkayne. There’s a video that explains it all!

<< Back to Authority Hubs Forward to RSS Syndication >>

Site Creation – Security Roles

No matter how large or small your company is, security should be a top priority. While you might not be managing hundreds of thousands of user’s credit card numbers, it is important to protect what data you do manage. When you run a website or a blog system, there are various security roles you need to configure.

What are security roles?

Some systems refer to them as user roles or membership roles. Essentially, when you have multiple people working on single items or a website as a whole, everybody is responsible for specific duties and tasks. For example, you would not want a blog contributor to have access to edit user accounts. Speaking of blogs, let’s take a look at the security roles in WordPress:

  1. Administrator – This user role has complete access to the entire system. Admins can do anything within WordPress including adding, deleting and changing all user accounts, blog posts, comments, links and pages. This is usually the blog owner and should only be access by use or someone you trust.
  2. Editor – Editors have complete control over all content such as links, categories, comments, posts and pages but they have no configuration access for the blog system nor can they create or delete user accounts. This role would usually go to someone who’s just there to moderate your blog.
  3. Author – Authors can write and publish posts without review from an Editor, but can only edit the posts they’ve created. They can also only manage the comments left on their posts. This role is designed for users which need to publish blog posts, but do not need to manage content they didn’t create.
  4. Contributor – Contributors are similar to authors except they cannot publish any posts. They can only submit posts for review by either an Editor or an Administrator. If you would like people to be able to submit their own writings to your site, give them this access.
  5. Subscriber – Visitors to your site can register (provided you allow them to) on your site and this account role will give them access to leave comments on any posts and modify their own user profile. Subscribers have no other access to the blog. There is an option in WordPress to force users to register to leave comments.

You should become familiar with each of these roles and what permissions they give to each user. You don’t want to be surprised later to discover that one of your users has more access than they need.

Benefits

If you’re the only person running your business/website, you will not see any benefit in creating various security roles. However, it’s important to understand your backend system and what types of controls you have over it because in the future, you may expand and require the help of others to maintain everything.

More often than not, you find in businesses where users are sharing their usernames and password to various systems to gain more access when they need it. This is very dangerous because all it takes is one person who knows what they can do with that access and your entire company can come down in one fell swoop.

Just like you lock your doors at night, never take for granted the security of your website and system software. It could mean the difference between a secured business and no business.

<< Back to Portals Forward to Memberships >>

Site Creation – PHP

PHP is a programming language used for creating dynamic webpages. Dynamic, as opposed to static, simply means that pages are created on the fly based on data from a database, user input or some other “call” for information. Originally created in 1995 as a set of CGI binaries, PHP has withstood the test of time and is currently in its 5th incarnation as PHP5.

Personally, I find that it’s the easiest programming language to work with when dealing with websites. This is because PHP gets integrated directly within HTML code and uses similar tags for performing functions. I’m no genus at coding PHP, but for creating basic scripts or even making changes to advanced scripts, I can hold my own! I also find that it’s a much speedier code when compared to others like CGI or Java and it’s also compatible with many different operating systems, webservers and all web browsers.

Above all, the best part about PHP is that it’s free! There is no cost to run PHP on your webserver and it’s already installed on practically every webhosting plan you can buy.

How does it work?

As mentioned earlier, PHP can be integrated directly within HTML code. By using dilemeters, you can tell PHP where to find code to parse on the page. Here’s an example of some PHP code within a webpage:
<html>
<head>
<title<PHP Test</title>
</head>
<body>
<?php
echo "Hello World";
/* echo("Hello World"); works as well, although echo isn't a
function (it's a language construct). In some cases, such
as when multiple parameters are passed to echo, parameters
cannot be enclosed in parentheses */
?>
</body>
</html>

The above code would display the words “Hello World” directly on a blank web page titled, PHP Test. By looking at this example, you can see how easy it is to have a standard HTML page, while integrating PHP within. Since the PHP parser only recognizes code inside the <?php ?> tags, everything else is sent to the browser as it normally would.

Why would I need it?

If you plan to use a CMS package like WordPress, you’ll be dealing with PHP in some form. Besides that, PHP offers a whole new world of functionality for your website and ultimately your users. Here are some common uses for PHP:

  • Web forms – Have you ever filled out a form on a site asking you for information like email address, name and phone number? These are all sent dynamically through a POST command to the website owner so they can collect your information.
  • Shopping carts – Every time you’ve bought something online, you more than likely were using PHP to place an order, fill out your information and send a payment.
  • Security – If you ever needed to access a secured area for a website, you may have seen PHP in action protecting the secured area.
  • Message boards – The majority of message board software is written in PHP.

This list can literally go on and on because just about anything you can think of can be written in PHP. That’s what makes it such a great language to use! It’s also very easy to learn. In fact, what little I know about PHP has all be learned by just looking at code and trying to figure out what it’s trying to do.

Where do I get PHP scripts?

Since its licensing is free (and open), scripts can come in all shapes and sizes from large corporations down to the guy in his basement and can cost anywhere from zero dollars to many thousands of dollars. When looking for PHP scripts to use, you first want to establish your goals.

To begin your search, start looking for scripts at HotScripts.com. They not only have a very large PHP database, but they house every other major programming language as well. Once you get to the site, you’ll notice that their PHP collection is the largest (many times over) than every other collection! This tells you just how popular PHP is.

More information

To get much more information as well as all the nitty, gritty details behind PHP, visit the official PHP website at php.net.

<< Back to Email Forward to Java >>

Site Creation – Web Hosting

It goes without saying, but you do need a web host in order to have a website. A web host is a company that provides a server that all of your website’s files are stored on and then served up to the visitors that come see your page. There are literally thousands of web hosting companies out there that range from huge corporations down to the guy running a server in his bedroom. So how do you choose just one?

Most web hosts get their customers through referrals, so if you happen to hear some good reviews about a particular company, you should look into it. However, opinions on quality, speed, price and customer service vary significantly. It’s important that you decide for yourself how these factors rank on your list. As an example, you may find that paying more per month to get better customer support is worth it, but someone else might feel speed is more valuable.

Finding the perfect host

This process is really based on what your site’s needs are. If you’re running a simple blog and don’t expect a lot of traffic (at least in the beginning), you can get away with a hosting plan that’s as low as $4.99 per month. In fact, GoDaddy offers hosting plans tailored specifically for WordPress blogs. The advantage to using GoDaddy is that if you also register your domains here, all of your services will be under one roof.

On the other hand, if your site is going to be serving up lots of content to lots of traffic, you’re going to need something bigger. Here’s a breakdown of some ideal hosting types and their intended use:

Hosting Type Description Selling Points Price Range
Free Hosting Since nothing is free in this world, what few remaining “free” hosts there are, simply add some type of advertisement to your site. This can be a pop-up window, a link on every page, a banner somewhere on your site, etc. Stay away from free hosts if you’re shooting for a professional image! Upside: no costs. Downside: not a professional image None $0
Shared Hosting Shared hosting is the most common way of hosting a website. It allows a hosting company to place multiple customers on a single server, therefore “sharing” system resources with other websites. Upside: the cost of the server is spread over lots of users, reducing your monthly bill. Downside: you don’t have control over advanced back-end features. Cheap, basic, easy $20-50+
Virtual Private Server (VPS) VPS hosting gives you full control of your server. Think of it as a hybrid between dedicated hosting and shared hosting. VPS allows a hosting company to create multiple “virtual” servers on one physical server so each client has complete access to their own private server, but the clients still share hardware resources. Some hosting companies will dedicated certain hardware to each virtual server such as system memory. Upside: shared costs for dedicated access. Downside: shared hardware resources Root access, faster, advanced, flexible $50-150+
Dedicated Hosting If you want to have a server all to yourself, opt for dedicated hosting. This will give you your own server to do with it what you will. A word of caution: this may be too advanced for some users! However, if you run a high traffic site that requires stability and speed, this is the option for you. Upside: no resources shared. Downside: requires routine maintenance on your part. No shared resources, highly advanced, stable, flexible $150-750+
Managed Hosting Having a dedicated server can take a lot out of you if you’re managing it yourself. Most hosting companies offer managed services so you don’t have to worry about day-to-day tasks such as hardware monitoring, backups, virus scanning, etc. Also, if you have any issues, you can get help much faster. Upside: maintenance done by company. Downside: costs more per month. No shared resources, highly advanced, stable, flexible, managed $250-750+
Server Co-location Now you’re one step away from running your own hosting company! Co-location allows you to build your own physical server and install it at a data center. This option provides 100% flexibility and customization while gaining all the features of a managed dedicated server. If you’re running a site that requires this setup, you probably wouldn’t be needing my help! Upside: complete control. Downside: complete responsibility. 100% flexibility, super advanced, no shared resources Custom Quote
Reseller Hosting With reseller hosting plans, you’re essentially purchasing a hosting plan (usually higher end) and the company allows you to re-sell your services to your own clients under your brand. I’d estimate a guess that about 80% of the “cheap” webhosts you find are nothing more than resellers. In most cases, a re-sold hosting plan is part of a larger shared hosting plan. Upside: sell services using your own name. Downside: you have to manage and support your clients. Cheap, various options, start your own hosting business $30-200

The above list is just a sample and is not considered exhaustive.

My recommendation

Since I’ve only hosted with 3 different companies, I can only comment on them. But of those 3, my personal recommendation is MediaTemple.net. There are a few things I love about this company, but the biggest one is that you can start off small (as low as $20/month) and upgrade at any time without upsetting your service. They are also home to some of the biggest sites on the Internet. So far, they’re customer support has been impeccable and the service is great.

Ultimately, choose the host that you feel will serve your website the way you want and don’t be lured in by insane claims such as “unlimited bandwidth” or “unlimited server space”. Stick with a tried and true company.

<< Back to Domain Registration Forward to DNS >>

Using Arkayne to bring focused traffic to your site

I discovered a new, free service that you may have already noticed on my site, but didn’t even know where it was coming from. I’m talking about a new form of link building that actually makes sense. It’s called Arkayne and the two best things about it are: it’s free and it integrates with WordPress. Getting quality backlinks has never been easier!

I found them during my search for a plugin that would display related content on my blog posts to help link my site together because we all know how hard it is to keep our visitors on our site and if they don’t actually search for something, they may never see it! All I was looking for was a feature that allows me to write a blog post and have the plugin run around all my previous posts and display some links with related tags and/or keywords.

I can’t tell you how awesome this service is, so you’ll have to take my word for it.

[simple_video]

If you don’t have a few minutes to spare to finish the video, this is basically what it does. You have an account profile on their site that you use to promote your site plus your social networking account which include Facebook, LinkedIn and Twitter. You then add some basic information about your site. Over on WordPress, you install the free plugin, insert your custom API code and let the magic begin!

In time, Arkayne will read through your entire site and essentially index your content on their site via links in your account. This makes you searchable to all Arkayne users. What will happen is people on the site will find your blog and if they deem it interesting and/or useful, they will click on Recommend and you basically have a “follower”. You, in turn, will also recommend blogs you find interesting and useful. This is a very useful tool for link building, which will get those coveted backlinks your site needs.

As time moves on, all of your posts will start to generate related links to other sites in the network and those sites who have recommended you will have your link show up on their posts. So just like other ranking sites, the more people that find your site useful, the more sites your links show up on.

Beyond that, you still get the feature I was originally looking for and that is this plugin will scour your site looking for related content that you’ve posted and place those links as well. You can even set how many links of each type are shown, from 1-5. You can see below that I currently have it set to show 3 of my links and 4 outside links.

The site appears to be running with a small amount of users so far (or least in the searches I did), but I have a lot of faith in this site due to it’s nature. Of course, only time will tell.

Join Arkayne Today!!

The power of 'autoblogging'

Whether you know it or not, the key to the success of your blog is post consistency. Imagine if you went to MSN.com every time you opened your browser and for three days straight, you saw the same news stories, videos, etc. Would that make you want to go back? Probably not, and for your visitors, this is more of a reality! You’re not MSN, you don’t have the manpower or resources to be MSN, so you have to work especially hard to keep your visitors coming back.

Welcome to the power of autoblogging! What this is, is a simple plugin that you install within WordPress that enables you to configure automated keyword searches throughout the entire Internet and have content posted directly to your blog. No longer do you have to try and fit consistant blog posts into your busy schedule!

Although I don’t use this plugin on ledfrog.com, I do have a couple of other blogs that I use it on and I can tell you first-hand, this thing is amazing! It’s almost like I have a full-time writing staff constantly updating and adding new things to my site. The best part is that I can control everything such as when the posts appear, how many per day, what topics I want to include, etc.

Advantages of autoblogging

  • Your blog populates content about whatever you choose based on keywords
  • You determine post frequency
  • You can customize the actual post times
  • Content is fresh and always sourced from the latest articles online

Just the first reason alone makes this software worth it. But, this software is EXTREMELY powerful as you can imagine and you want to be careful about how you use it!

DIS-Advantages of autoblogging

  • Your blog can become “polluted” with recycled content
  • Some keywords can pull up mis-information (i.e. you want in article on Windows 7 and it pulls up an article about 7 different window treatments you can buy for your home)
  • Since the content is not entirely original, your blog can suffer in the rankings if you don’t add your own content
  • You will become a lazy blogger!

All-in-all, I love auto blogging software because I do it the right way. I’ll have it scour the Internet for me, grab a few articles and once they’re posted, I’ll go back into them and write up some additional notes or commentary. However, I never use content from any other source without given the original author credit. For example, in every single case where I might use someone else’s content, I’ll post a backlink and some very obvious text that clearly states I’m not the creator of the content.

Doing this will ensure that people know you’re not copying content and information just to try and rank higher in the search engines.

My advice is if you want to increase your post frequency, but you just don’t have the time, use PowerAutoblog and let it build your blog for you!

There’s a limited time offer (ONLY $47!!) on this software, but you’ll have to act now to get it. I’m kind of upset really, because I had to pay $150 for this when it first came out!

Download PowerAutoblog Now